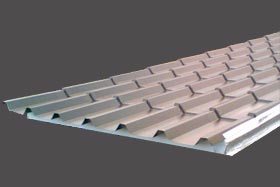
Insulated tile effect sheets
- Looks like traditional roof tiles. Panels are lightweight and provide a rapid weathertight insulated roof which performs better than any tiling system at a fraction of the cost.
- Energy efficient, helps reduce heat loss and energy bills
- Visually more acceptable in Sensitive Area's
- Can be used on Low Roof Pitches
- Increased Strength and rigidity but lightweight on roof
- PVC Coated Leathergrain finish on Galvanised Steel
- 7 box profiles for added strength, giving 1 Metre cover width
- External Finish: Plastisol or Polyester Coating
- Internal Finish: Smooth Bright White Polyester
- External Profile: RC32/1000 32mm profile height, 167mm pitch
- Standard Width: 1000mm
- Max Length: 7000mm
- Minimum pitch: 10 degrees
- External Gauge: 0.5mm Steel
- Internal Gauge: 0.4mm Steel

Insulated tiled roofing sheet
These Tile Effect sheets are fitted the same as standard sheets with a self drilling screw through the sheet into the joist below. The tile effect pattern occurs every 315mm (12.5ins) down the length of the sheet. Ideally for effect the screws should be located just below the end of the tile.
You don’t need to fix every 315mm, so multiples of 315mm will do. If you aren’t able to locate the screws in this position, then fitting them to suit your existing purlins is not a problem. All screws come with colour caps which match the colour of your sheets.
These sheets are manufactured to your exact lengths and they give 1 metre width cover. As with all sheets, start by laying the sheets at the opposite end of the roof away from the prevailing wind,so the overlap is facing downwind.
When ordering Insulated panels, you may need to inform us of your preferred direction of lay, left to right or right to left, as viewed from the gutter. It may be important that you establish the direction of the prevailing wind, as the Insulated sheets have a *cut back at the gutter end to allow the water to run off the top sheet successfully. (a cut back is where the insulation and inner sheet are cut back away from the top sheet). So you will not be able to change the direction of lay once the sheets are manufactured. As before, start by laying the sheets at the opposite end of the roof away from the prevailing wind, so the overlap is facing downwind.

